You could reach the Manufacturing Planning
and Machine Control form from the Manufacturing module. On this form you
could follow-up daily/monthly planning and manufacturing statuses of machines
and lot manufacturing planning activities.
Daily Manufacturing Control
In this section setting deadlines becomes easier by planning the daily
workload of machines. This screen lets users to plan which machine will
be used at what time for which lot. If Manufacturing Colors on the bottom
of the page are marked, colors set in the laboratory study are reflected
on this screen as well. Lists about projected plans could be accessed
from this screen.
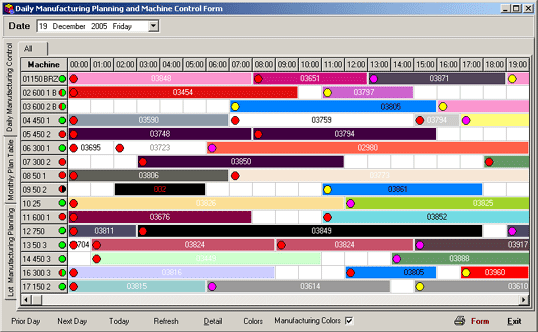
Figure 4 Daily Manufacturing Planning Form
While on the Manufacturing Planning Entry
screen, clicking the record row brings the details of the record. Other
information of the record is displayed on the upper corner of planning
module as well. Manufacturing planning date is selected from Date
field. Thus, by moving between dates, date based furnace planning could
be reviewed in one table. Current date is automatically displayed when
daily manufacturing planning form is opened.
According to selection of the machine group tabs located on the upper
part of the form only related machiens could be displayed on the form.
Machine group names are parametric
thus you could define the machine group within machine cards (Group
Type button on the Machine Cards)
You could switch the machine planned for the lot by pressing the F8
button and displaying the Change Machine window after selecting
the related planning card form.

Figure 5 Change Machine
In order to define the machine code on this
screen, you could use the machine list displayed when the Machine
button is clicked.
In order to reach all planning
and manufacturing records of the lot, press F10 key after selecting
the related lot on Manufacturing Status Form to display the Lot Status
Control Form on the screen.

Figure 6 Lot Status Control Form
With the Previous Day[F3] button
you could reach the previous day's records while you are viewing the planning
details.
With the Next Day[F2] button, you could reach the next day's records
while you are viewing the planning details.
With Today[F7] button you could reach the current day's records.
With Planning Entry[F1] button the planning detail form could be
displayed on the screen.
With the Manufacturing Colors button lot colors are shown on the
form.
With the Colors button you could reach the definitions of colors
used on the form.
With the Refresh button, information on the screen is refreshed.
With the Form button, you could reach lists related with planning
(daily - monthly manufacturing planning form, machine planning lists based
on machine and registration)
With the Exit button, planning form can be closed.
Monthly Planning Table
On the screen displayed after this tab is selected, you could follow-up
monthly planning statuses of the machines, and set the most appropriate
deadlines.
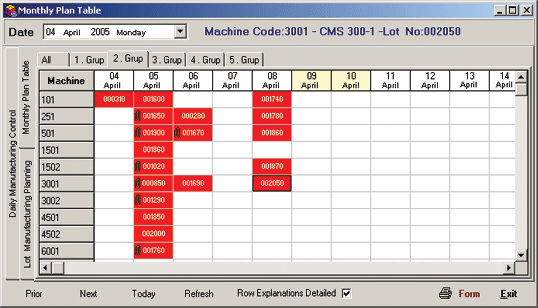
Figure 7 Monthly Planning Table
While on the planning detail screen, with
the use of Previous [F3] button
you could reach previous period's records.
While on the planning detail screen, with the use of Next [F2] button
you could reach next period's records.
With Today [F7] button, you could reach the current day's records.
With Planning Entry [F1] button the planning detail from could be
displayed on the screen.
When Detailed Row Explanations option is on and the related planning
record on the form is selected, detailed explanations of records are displayed
on the screen.
With the Refresh[F5] button the information on the screen is refreshed.
With the Form button you could reach lists related with planning
(daily - monthly manufacturing planning form, machine planning lists based
on machine and registration)
With the Exit button the planning form is closed.
![]()
![]() Symbol denotes there is more than one planning records for the machine.
Symbol denotes there is more than one planning records for the machine.
Lot Manufacturing Planning
On the screen when this tab is selected, you could planning and manufacturing
information of the lots could be wiewed and new planning records could be
added.
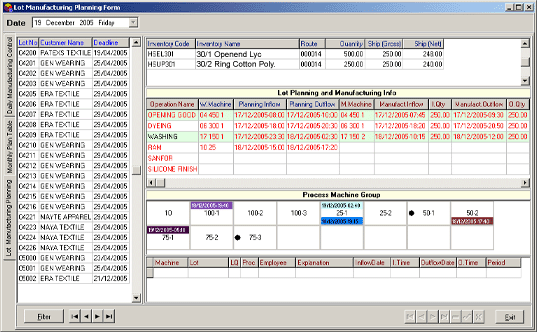
Figure 8 Lot Manufacturing Planning Form
In Process Machine Groups section, the machines to proceed with the
necessary processe and their information on planning / manufacturing could
be followed up. In the section above the machine code, planning date, time
and color information, below, manufacturing date, time and color information
could be tracked. The symbol next to machine code denoted machine has time
wasted.
Machine codes to be reflected to the process machine groups are defined
on Process / Time table.
In order to create the planning record, select and drag & drop the
machine code to be planned on the Lot Planning and Manufacturing Information
section.
PLANING ENTRY Main
Menu
Machine Planning; is either achieved
on the machine selected on the Machine Control Form by pressing the F1 key
or on the machine selected in the Planning Detail Form displayed when F8
key is pressed on the selected machine in Manufacturing Status Form.
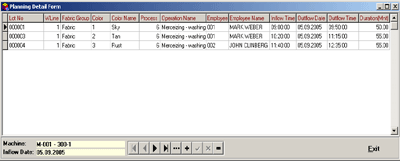
Figure 9 Planning Detail Form
Lot No is the field, where planned lot number is entered.
The lot to be planned is selected from the list dispayed after pressing the F9 key or the list button.
![]()
In order
to plan the whole lot, it is sufficient to leave the Lot Line
as "0". Thus standard time calculations will be done considering the
whole lot, and the planning exit date and time will absolutely be
correct.
In the Clothe Group field, the clothe group (group field in the inventory card) that is in the set lot number and row is reflected. Thus values in Process/Time table are used to calculate the duration automatically.
The "Color Number" of the lot is automatically displayed in the Color field.
The "Color Name" of the lot is automatically displayed in the Color Name field.
In the Process field, the related process is selected from the list displayed on the screen after pressing the F9 key or using the list button.
The explanation of the process is displayed in the Process Name field.
The related registration (personnel) is selected in the Registration field, where the registration list is displayed when F9 key is pressed or the list button is clicked.
The explanation of the registration code is reflected in the Registration Name field.
Any explanations to notify the user/employee is entered in the Note field.
Planned entry time is entered in the Entry Time field. This field cannot be left blank.
Planned exit time is entered in the Exit Time field. This field cannot be left blank.
Planned exit date is entered in the Exit Date field. This field cannot be left blank.
Planned duration is automatically reflected in the Duration field..
| Controls (Capacity, Duration, etc) that will be processed during planning by the application are set in the fields located in Manufacturing and Planning tabs in SentezDye parameters section. |
Planning Copy (F8): Copies the planning
row information. To do this, first a blank planning row must be created.
Planning List (Shift+F9): Displays the list of lots to be planned
on the screen.
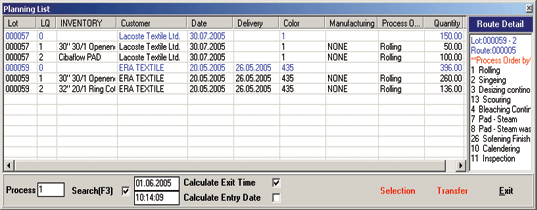
Figure 10 Planning List
Enter the process code in the Process field and search the related lotss. The lots to be planned are selected by clicking the Select button. The selected row colors turn to Red.
If Calculate Exit Time option is selected, planning exit time is automatically calculated by the application.
If Calculate Entry Time option is selected, the following planning record's entry date and time will automatically be calculated by the application.
The entry date and time info of the first planning record could be set
by selecting the ![]() option.
option.
By clicking the Transfer button plannings are recorded.
By pressing F5 key while on this list, route information belonging to the lot could be followed up.
While on this list, pressing the F10 key will bring the option to display the list of only selected records or all records.
The Manufacturing column on the Planning List displays the momentary manufacturing information of the lot.
The S (Status) column on the Planning List displays the manufacturing status (Ý: Manufacturing continues, Ç: Manufacturing completed) of the lot.
The Process Order column on the Planning List displays the next manufacturing step of the lot.
Blue row denotes the whole lot in the Planning List. If this row is selected, all detail rows of the lot are automatically selected.