Cards
In the Cards Module, various registration cards
are generated and information is entered. The sub-menus of the Reservation
and Front Desk sections use most of the cards. For example, the information
entered in the Market Codes and Nationality Cards are displayed and used
by the Reservation Card. It is possible to generate lists from the related
card as well as preparing report printouts or Card Statistics from the
Reports Module.
Guest
Card
This is the registry card filled by the hotel’s guests
during Check-In, which can also be opened automatically during this process.
The more detailed reports based on the personal information (Police Report,
Daily guest list, etc.) are taken once the Guest Card information is completely
filled.
A number is automatically assigned in the No field.
The card owner’s Name and Last Name are entered In the Last Name,
Name field.
Guest
Card General Information Window
The
guest’s personal information such as Address, Telephone,
Fax, Occupation, Language, Marital Status
is entered.
The guest’s sex is mentioned in the Sex Field.
In the Guest type, the related types are selected from the alternatives
such as VIP, CIP, Black List, Frequent Guest.
.
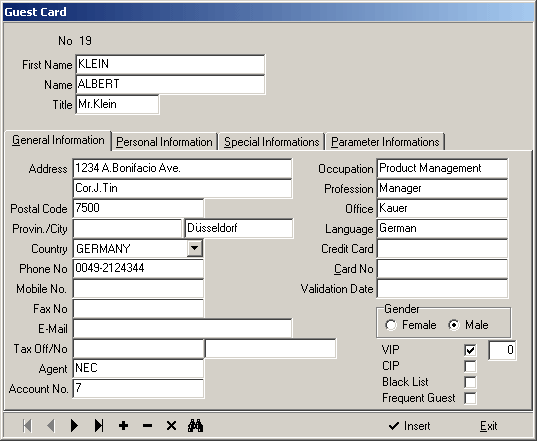
Figure 1 Guest Card / General Information
Personal Information
The guest’s personal information is defined in this field.
In the Marital Status field the guest’s marital status is defined.
In the Date of Marriage field the guest’s wedding date is entered, if
the guest is married.
If the guest is married, the related information is entered in the Name
of the Spouse, Spouse’s Date of Birth, Number of Children fields.
Once the other fields are filled in accordingly, the information is saved
with the Save button.
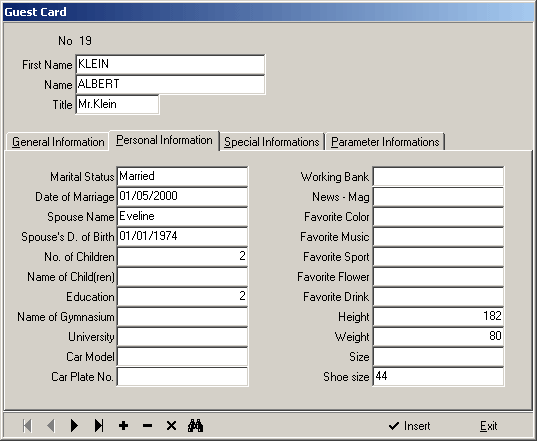
Figure 2 Guest Card / Personal Information
Guest
Card Personal Information Window
The related fields are defined from
the Sentez DeLux Software Installation
Program / Front Office Parameters section with the purpose of knowing
the personal information of the guest. The information for the related
fields, which are defined from the parameters, is entered. The information
for the selected fields is displayed as message during the check-in operation
of the guest.
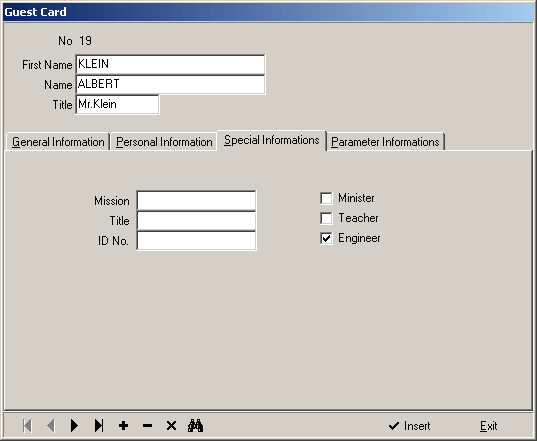
Figure 3 Guest Card / Special Information
Guest
Card Parameter Information Window
Display the info entry fields by opening parameter
names special to the guest from Sentez DeLux
Setup Program / Front Office Parameters. 10 Alphabetical Parameter, 5
Date Parameter and 5 Numerical Parameter definitions can be made..
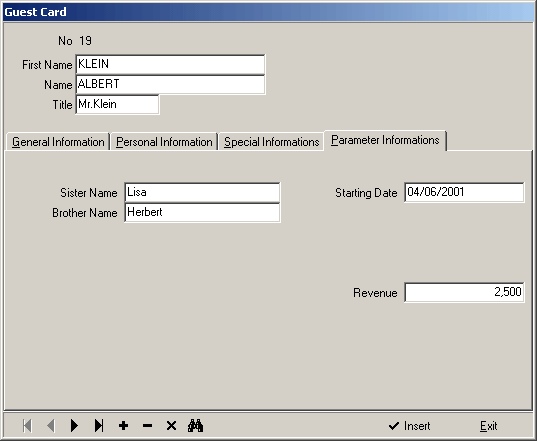
Figure 4 Guest Card / Parameter Information
Pressing the F5 key or clicking the Insert button records
the Guest Card.
Account
Cards
When the (+) button is clicked in the
Account No field, the program enters a number which increases automatically.
In the Agent Code field, the agent’s code is entered if an agent
is involved. This code can be selected from the Agency List, which is
displayed by pressing the F7 key or clicking the Find button. The agency
code field is left empty if there is no agent.
If the account card opens automatically during the Check-In process, entering
the Agency Code displays the Guest Name. Otherwise the guest name is entered
manually.
In the Status field, according to the final status of the account, the
defined option is clicked. If the selection is “Open” receipt is entered
to the accounts. If the selection is “Closed” accounts cannot be processed.
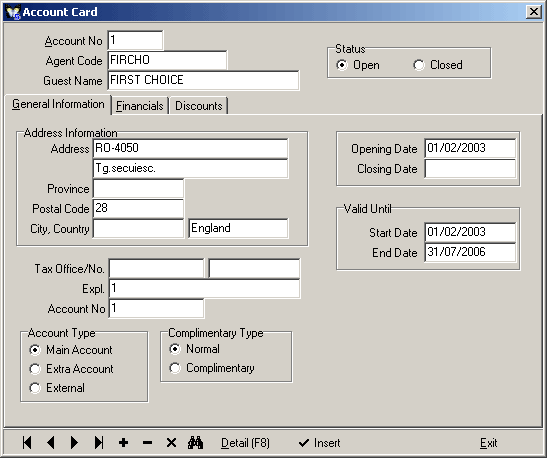 Figure 5 Account Card
Click Find Button
in the Account No to display the Account Filter. After the
related process is done, click the Insert button to display the
Account Cards List. Choose the related account and click the Select
button to transfer the account info to the Account Card. By clicking the
Details(F8) button in the Account Card, the Main Account or the
Extras Account are displayed on the screen.
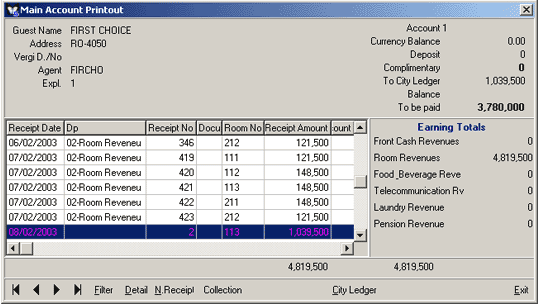
Figure 6 Account Printout
To issue an invoice
in accordance with the displayed Account Printout, click the Invoice
button to display the guest’s Invoice info.
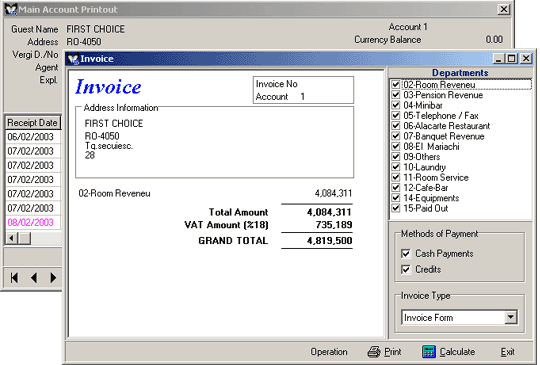
Figure 7 Invoice
Account
Card General Information Window
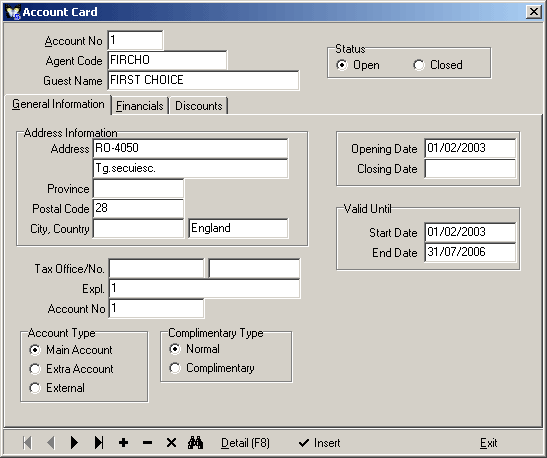 Figure 8 Account Card / General Information
In the Address Information field,
enter the guest’s address information.
In the Account Type field, depending on the Check-In type, the
main account or the extra account types are defined. When the Main Account
is displayed the receipt activities for the main account are collected.
When the extras account is displayed, the guest’s extra expenses are seen.
(Lobby Bar, Telephone, Snack Bar, etc.)
If the selection is “Normal” in the Complimentary Type field,
all receipt activity effect the main and extra accounts and guest’s total
expenses are entered into the account. If the selection is “Complimentary”
the receipt activities are entered into the account but the credit and
debit are not effected.
Enter in the Opening Date field, the date the Account is opened
and the transaction is transferred to the account
In the Closing Date field, enter the date that the Account card
was last processed and the account is closed.
| |
In the Closing Date field the operation date value is entered automatically during the Check-Out operation, and no further process can be applied on the account after that date. |
Account
Card Financial Information Window
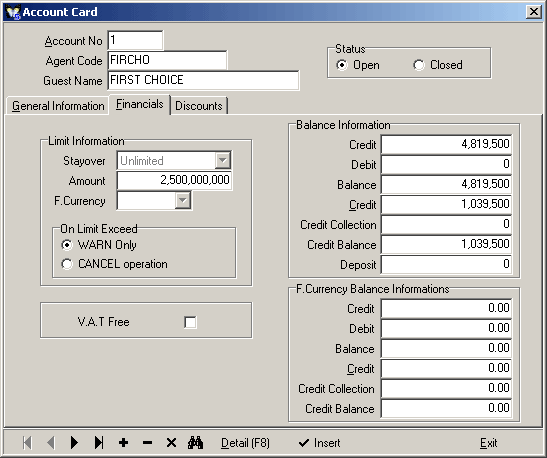 Figure 9 Account Card / Financial Information
Purpose of the Limit Information field
is to control the limits shown in accounts for the guests and the agents.
In the Stayover field the “Unlimited” selection defines
the limit without any date interval, the “Daily” selection defines
the daily limit from the opening date to the closing date, and the “Monthly”
selection defines the monthly periodical limit starting from the opening
date.
In the Amount field the amount of the limit is entered; the limit’s
foreign currency type is entered to the F. Currency field by
clicking the selection window and selecting the currency type from the
displayed list.
In the On Limit Exceed field, if the
selection is “Warn only”, for every operation that exceeds the
limit stated in Account card, a warning is given. If the selection is
“Cancel Operation” permission is not given to exceed the limit
stated in the account card.
.
In the VAT Free field, when invoicing the information on the account,
VAT is not separated in the invoice, but the calculation is done
without VAT on the total amount. If this parameter is not selected,
the VAT percentage is calculated on the receipts and this is reflected
on the invoice as it is.
In the Balance Information field, the total balance of the credit
and debit, the deposits taken and the credited amounts of the guest are
tracked. This is for information purposes only.
In the Foreign Currency Balance Information field it is possible to follow up the foreign currency expenses and payments of the guest. Credit, debit and credit balance information is tracked.
Balance information will be processed automatically in “enter” and “exit” of each operation.
Account Card Discounts
Window
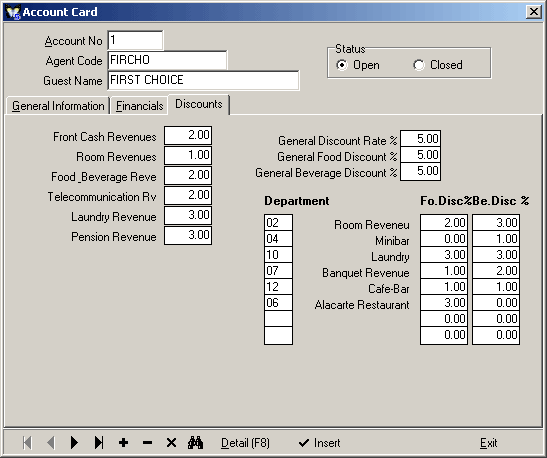
Figure 10 Account Card / Discounts
If in the Hotel, there is a different
discount practice between the departments, and the discount application
varies among the guests, then the discount fields for the departments
should be filled in the account card. According to the information entered,
every expense or payment activity is reflected to the account card as
per that discount rate entered. Also in general, inclusive of all departments,
the general discount rate may be entered so that all activities in all
of the departments may be calculated with a single rate and this is reflected
to the account card.
All information entered is saved by pressing the F5 key or clicking
the Insert button.
Room
Maintenance Info
The Room
Maintenance Information must be entered in order to be able to see the
time intervals of the rooms maintained. The information entered in the
Room Rack screen will be displayed.
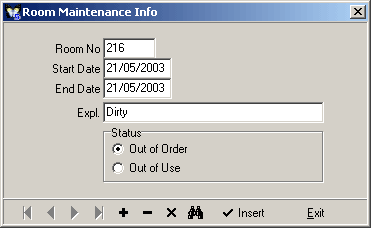
Figure 11 Room Maintenance Info
In the Room No field enter the room number
that the maintenance status info or the final status info will be given.
In the Start Date field enter the start date of the maintenance.
In the End Date field enter the date that the maintenance or the
related info is finished. Check-in is not allowed until the room’s maintenance
is completed.
In the Expl. field enter the information about the maintenance.
In the Status field, select regarding the size of the trouble.
The Department or the room with trouble may be put Out of Use or
Out of Order.
Click Find button to display the Room Maintenance List. Click Select
button to open the related Room Maintenance Card and display the Room
Maintenance Info.
Press F5 key or click Insert button to record the Room Maintenance
Info.
Lost & Found
The Lost & Found forms are
filled to keep track of the lost and found status of the missing belongings.
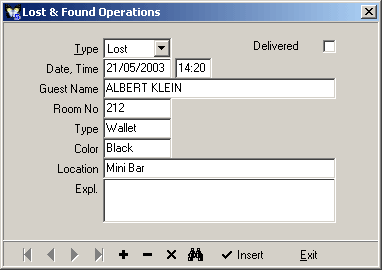
Figure 12 Lost & Found Operations
Click
the select window in the Type field and select from the
list. Selecting Lost states that the Guest reported a loss, Found
states that the item is found.
Enter the date and time of the loss in the Date/Time field.
Enter the name of the person that the loss belongs to in the Guest
Name field.
Enter the room number of the person that the loss belongs to in the Room
No field.
Enter the type of the loss in the Type field.
Enter the color of the loss in the Color field.
Enter the place where the belonging was lost in the Location field.
Enter special explanations in the Expl. field, if there is any.
After the loss is delivered to the guest, display the related account
and click Delivered in the Delivered field.
Click Find button to display Lost & Found List. Clicking the Select
button display the Lost & Found Card.
Press the F5 key or Insert button to record the information.
Trouble
Notifications
Enter the troubles in
the rooms and keep track.
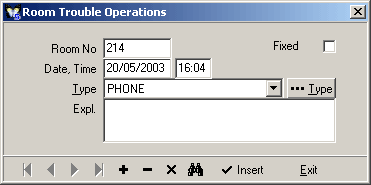
Figure 13 Trouble Notifications
Enter the trouble room number in the
Room No field.
Enter the date and the time of the trouble occurred or reported in the
Date, Time field.
In the Type field, click the select window to select the troubled
area from the displayed list.
Click the Type button if the troubled area is not registered on
the list.
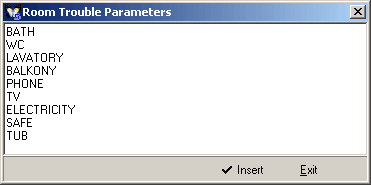
Fgure 14 Room Trouble Parameters
Each time the new trouble areas are entered in
the Room Trouble Parameters form press Enter key and click Insert
button to record the information. Exit the parameters by clicking the
Exit key.
Enter in the Explanations field if there is any information regarding
the troubles.
In the Fixed field, select as appropriate if the trouble is fixed to show
in the reports.
Click Find button to display the Room Trouble List and click Select
button to open the related card.
Press the F5 key or click Insert button to record the typed
information.
Department
Cards
Cards
are created for all the departments in the hotel. Departments that are
different from the fixed department definitions that come from the installation
parameters, are defined in this section.
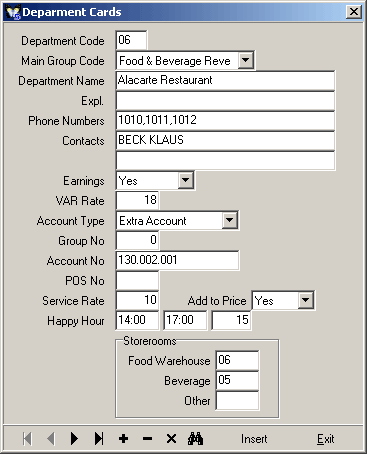
Figure 15 Department Cards
Enter a 2-digit code number in the
Department Code field to enable the tracking of the department
to be defined.
In the Main Group Code field, click the Select window to
select from the displayed list to keep track of the Cost operations in
the reports. Any operation processed from this department effects the
cost reports. (The main group codes in this field are defined by the department
parameters.)
Enter the related department’s name in the Department Name field.
Enter the explanations about the Department in the Expl. field.
In the Phone Numbers field enter the extension telephone number
in the department. To calculate the staff telephone calls, the calls made
from the extension number written in this field are priced separately.
Enter the names of the managers in the department in the Contacts
field.
In the Earnings field, click the select window to determine whether
the activities in the Department effect the hotel income or not.
When “Yes” is selected the total receipt activities effect the
hotel reports and hotel receipts as income.
When “No” is selected the income activity does not happen. If the
Income field in the Department Cards chosen as deposits selecting the
select button, the department is displayed in the Deposit Receipt.
In the VAT rate field, the VAT
rate that will be applied to all the activities in the department is defined.
In the Account Type field, click the Select window to display the
list to define the parameter that determines which account will be mainly
used to enter the department activities. The activities will be entered
to the main account when the “Main Account “ is selected.
If the “Extras Account” is selected, the activities are entered into the
extras account. If there is no Extras Account than the Main account is
used.
In the Account No field, enter the income account code for the
related department’s single order accounting plan. So that when the general
ledger integration is done the related department’s income is entered
in the defined account.
Enter the POS number in the POS No. field if there is Point of
Sales operations in the hotel.
Enter the percentage rate in the Service Rate field, if any service
rate will be charged for that Department.
In the Add to Price field, click the select window and click again
as “Yes” or “No” depending on whether the service rate will be added to
the price or not.
In the Food Warehouse field, in order to trace the Costs and POS
activities, enter the code for the related food warehouse to activate
it whenever an entry and exit is registered.
In the Beverage field, in order to trace the Costs and POS activities,
enter the code for the related beverage warehouse to activate it whenever
an entry and exit is registered.
In the Happy Hour field enter the discount rate and the time intervals
when the discount will be applied. Enter the time intervals in the first
two fields, and enter the discount rate on % bases in the last field.
The purpose of the Happy Hour is to increase the customer attendance by
offering discounts during slow hours.
Click Find button to display the Department Card List and click
Select button to display the list and select the related Department to
receive the related Department Card information.
Press the F5 key or click the Insert button to record the
information.
Fixed Rate Utilities Definitions
If the hotel practices fixed rate
utility system for certain expenditures, the fixed rate utility specifications
are defined in this menu. It runs automatically by entering the Fixed
Rate Utility Codes defined from the Reservation and Check-In Cards. This
operation is activated with the night-audit operation.
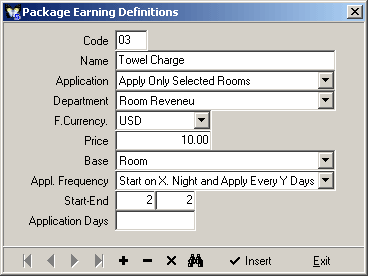
Figure 16 Fixed Rate Utility Definitions
In
the Code field, enter a code to trace the fixed-income types. These
codes are used in the Fixed Rate Utility part of the Sentez DeLux
Program / Check-In Card and the Reservations section.
In the Name field, enter the name of the fixed-income for which
the card is generated.
In the Application field, click select window. To apply
the fixed rate to all rooms, select “Apply to All Rooms” from the
displayed list. The income for this department is then automatically entered
to the accounts of the Check-In rooms. If “Apply only to Selected Rooms”
is selected, during check-in define the related code to enter the price
in the fixed rate utility income field..
In the Department field click select window. From the displayed
list, select the department to add the revenue to.
In the Price field, enter the price of the definition of the fixed
rate utility that will effect the revenue making department.
In the Base field,
click the select window; from the displayed list select the pricing type.
(Room, Person, Adult and Child Basis calculations can be done.)
In the Appl. Frequency field,
click the select window; from the displayed list select the frequency
of the application during the period of the guest’s stay.
In the Start-End field, select the application frequency “start
on X day and apply every Y days”; enter the start day as X and the every
Y day numerical. Monday is taken as basis 1. Starting from the defined
day, any day will be selected to enter the price to the account for every
Y day application.
In the Application Days field, select “Only selected nights” for
the application frequency; take Monday the basis as the first day, enter
“1” in the application day, and “0” in the non-application day, the price
is entered the account accordingly. (For example: If the price application
days are Monday and Wednesday, 1010000 should be entered)
Press the F5 key or click the Insert button to record the
information.
Room
Card
All rooms are defined to select rooms.
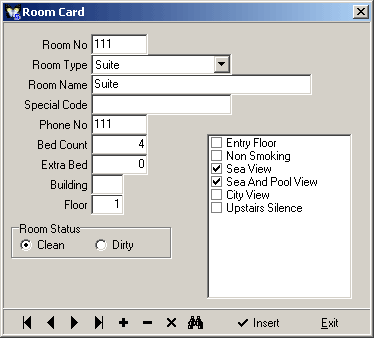
Figure 17 Room Card
In the Room No: field, enter the room number
to be defined.
In the Room type field, click the select window to select from
available room types defined in the Parameters. To select a new Room Type
return to Sentez DeLux Software Installation
Program / Front Office Parameters to define Room Type.
In the Room Name & Special Code field, enter the Room
Name and the Code.
In the Phone No field, enter the Extension Room Telephone number.
In the Bed Count field enter the number of beds in the room. If
already entered, enter the number of Extra Beds.
In the Building, Floor field, enter the building and floor
information for the room.
In the Room Status field, define the clear or dirty status of the
room.
In the Room Specifications field, enter the room specifications
according to its location, checking specifications such as Entry Floor,
Non Smoking, Sea View, City Viwe and Sea And Pool View. The values are
defined which will be displayed by Sentez DeLux
Software Setup Program / Front OfficeParameters department. This information
is displayed on the Room Rack screen.
Click Find button to display the Room List. Click the Selection
button to select the room to display from this list.
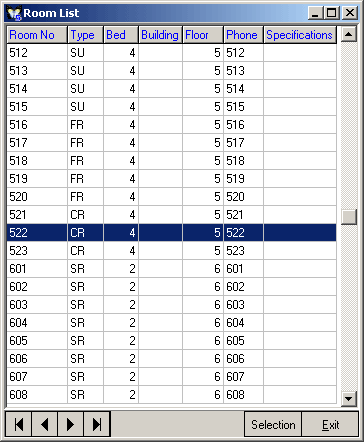
Figure 18 Room List
Press
the F5 key or click Insert button to record the information.
Nationality
Cards
For each nationality, a card
is generated to use on Reservation Card and Check-In Card.
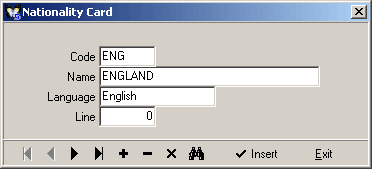
Figure 19 Nationality Cards
In the Code field, enter the abbreviated
code to assist at the Nationality follow-up stage.
In the Name & Language fields, enter the name and the
language of the Nationality.
In the Line field, enter the sequence number of the nationality
in the report.
Press the F7 key or click the Find button to display the Nationality
List. Click the Selection button to select Nationality to transfer it
to the Nationality Card.
Press the F5 key or click the Insert button to record the
information.
Market
Codes
A market card is created
for the guest visiting reason to use in the Reservation Card and Check-In
Card for the reason to come to the hotel.
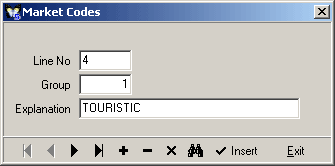
Figure
20 Market Codes
In the Line No: field, enter the
markets sequence number in the list.
In the Group field, enter a grouping name to group the markets.
In the Explanation field, enter the required explanation regarding
the markets.
Click the Find button to display the Market Codes List. Click the
Selection button to display the list. Select the market and transfer to
Market Codes.
Press the F5 key or click the Insert button to record the
market codes.
Special Dates
The
Special Date section is filled to enter the special dates (new year, national
holidays, etc.) when the guest occupancy is expected to increase. The
information entered is displayed on the Forecast Chart. The days marked
red on this screen indicates the Special Date entries.
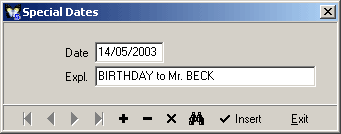
Figure 21 Special Dates
In the
Date & Explanation field, enter the related date and
the related explanation (Turkish Night, New Year’s Night, etc.).
Click the Find button to display the Special Dates List. Click
the Selection button to select the related date and transfer it
to the Special Dates screen.
Press the F5 key or click the Insert button to record the
information.
Special Places
The Special Places section is recorded to keep
track of the addresses and telephone numbers of the business centers in
the neighborhood.
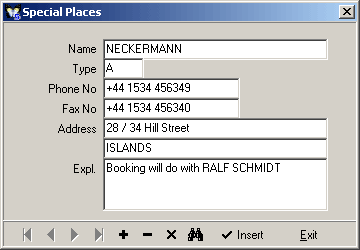
Figure 22 Special Places
In the Special Places section enter the
Name, Type, Phone No, Fax No, Address
and Expl. of the Special Place in the related fields.
Enter a value in the Type field, input limitations in the filter
and make an easy access to the information about the special places.
Click the Find button to display the Special Places List. Click
the Selection button to select the related place and transfer it to the
Special Places screen.
Press the F5 key or click the Insert button to record the
information.
Special
Activities
The Special Activities section
is selected to record activity entries to keep track of the activities
organized in your hotel or in your neighborhood. (Meetings, seminars etc.)
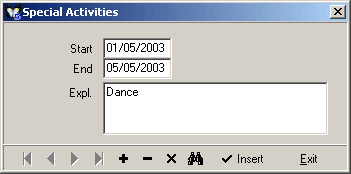
Figure 23 Special Activities
Fill in the Start, End & Expl.
fields and record by pressing the F5 key or clicking the Insert
button.
Click the Find button to display the Special Activities List. Click
the Selection button to select and transfer the activity to the Special
Activities screen and, if necessary, the changes can be done.